#INTRODUCTION
Thank you for purchasing or using our Magazine WordPress theme!
We at EverestThemes are confident that you’ll be delighted with Grace Mag’s vast customizer feature options and modern magazine design WordPress Theme.
Please read carefully this file for any questions or issues you may be experiencing– it’s likely you’ll find the answer to your query here.
If you have any query that is beyond the scope of the document, please feel free to contact us at [email protected] or visit our support forum.
IMPORTANT NOTE:
Click on the screenshot if the text written at the screenshot is not readable.
This documentation is for all Free & Pro users. We have indicated Pro tag which is applicable only for Pro Users.
We have different image sizes for different sections. We recommend you to use greater than 1200* 900 px image size of images for best design match in all sections.
Thanks so much!
#INSTALLATION
If you have downloaded “Grace Mag Theme”, please unzip the downloaded package from Theme Store to your desktop. In the downloaded package, you will find grace-mag.zip which is the WordPress theme file. For Pro users, the Theme File may appear as grace-mag-pro.zip
For MAC users when you download a theme file make sure you do not unzip the grace-mag-pro.zip file. You are supposed to upload the .zip file itself.
You can install the theme one of two ways:
METHOD: 1
THEME INSTALLATION THROUGH WORDPRESS DASHBOARD
- Step 1: Login to your admin page.
- Step 2: Navigate to Appearance → Themes.
- Step 3: Click Install Themes and click the upload button
- Step 4: Navigate to find the grace-mag.zip file on your computer and click Install Now.
- Step 5: Wait while the theme is uploaded and installed.
- Step 6: Activate the newly installed theme. Go to Appearance → Themes and activate it.
Check this video tutorial to know how to install via the WordPress admin panel: ( )
METHOD: 2
THEME INSTALLATION THROUGH FTP
- Step 1: Log into your FTP client to access your host web server.
- Step 2: Browse to find the grace-mag.zip file on your computer and extract the grace-mag.zip file
- Step 3: Upload the extracted folder to the /WP-content/themes/ folder on your server.
- Step 4: Login to your admin page.
- Step 5: Activate the newly installed theme. Go to Appearance → Themes and activate it.
#REQUIRED ACTIONS
After your active Grace Mag Theme, you will see a notification message to install and activate Everest Toolkit and setup links which are shown in the screenshot below.
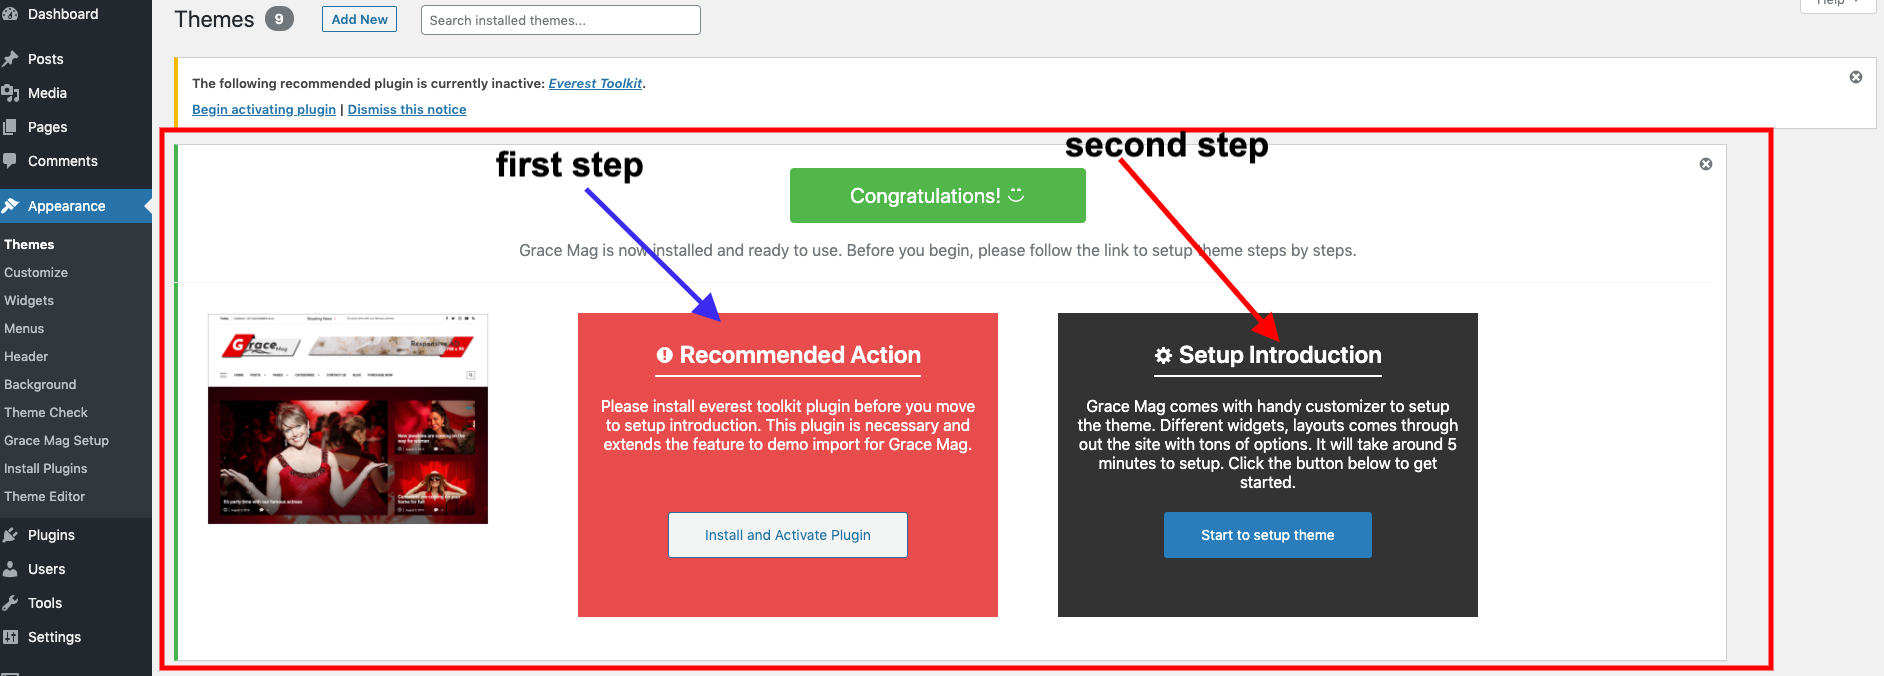
As shown in the screenshot, install and activate the plugin which will be opened in a new tab. Do this step and return back to this page. Now you are ready to go for the setup page. Click on the Start to setup theme button and you will be redirected to the welcome page.
Note:
This process may or might be different for pro and free users.
#WELCOME SCREEN
We have included a welcome screen on your WordPress to make it easy to navigate everything about Grace Mag Theme.
For Pro Users :
After activating theme & plugin, navigate to Appearance → Grace Mag Info Pro. You can see the image below for reference:

Getting Started Tab: This tab shows you the steps to start the theme and links for documentation, video tutorials and to buy Pro theme.
Recommended Actions Tab: This tab shows the required plugin to install for the theme.
Support Tab: This tab shows you links for any kind of support required relating to this theme.
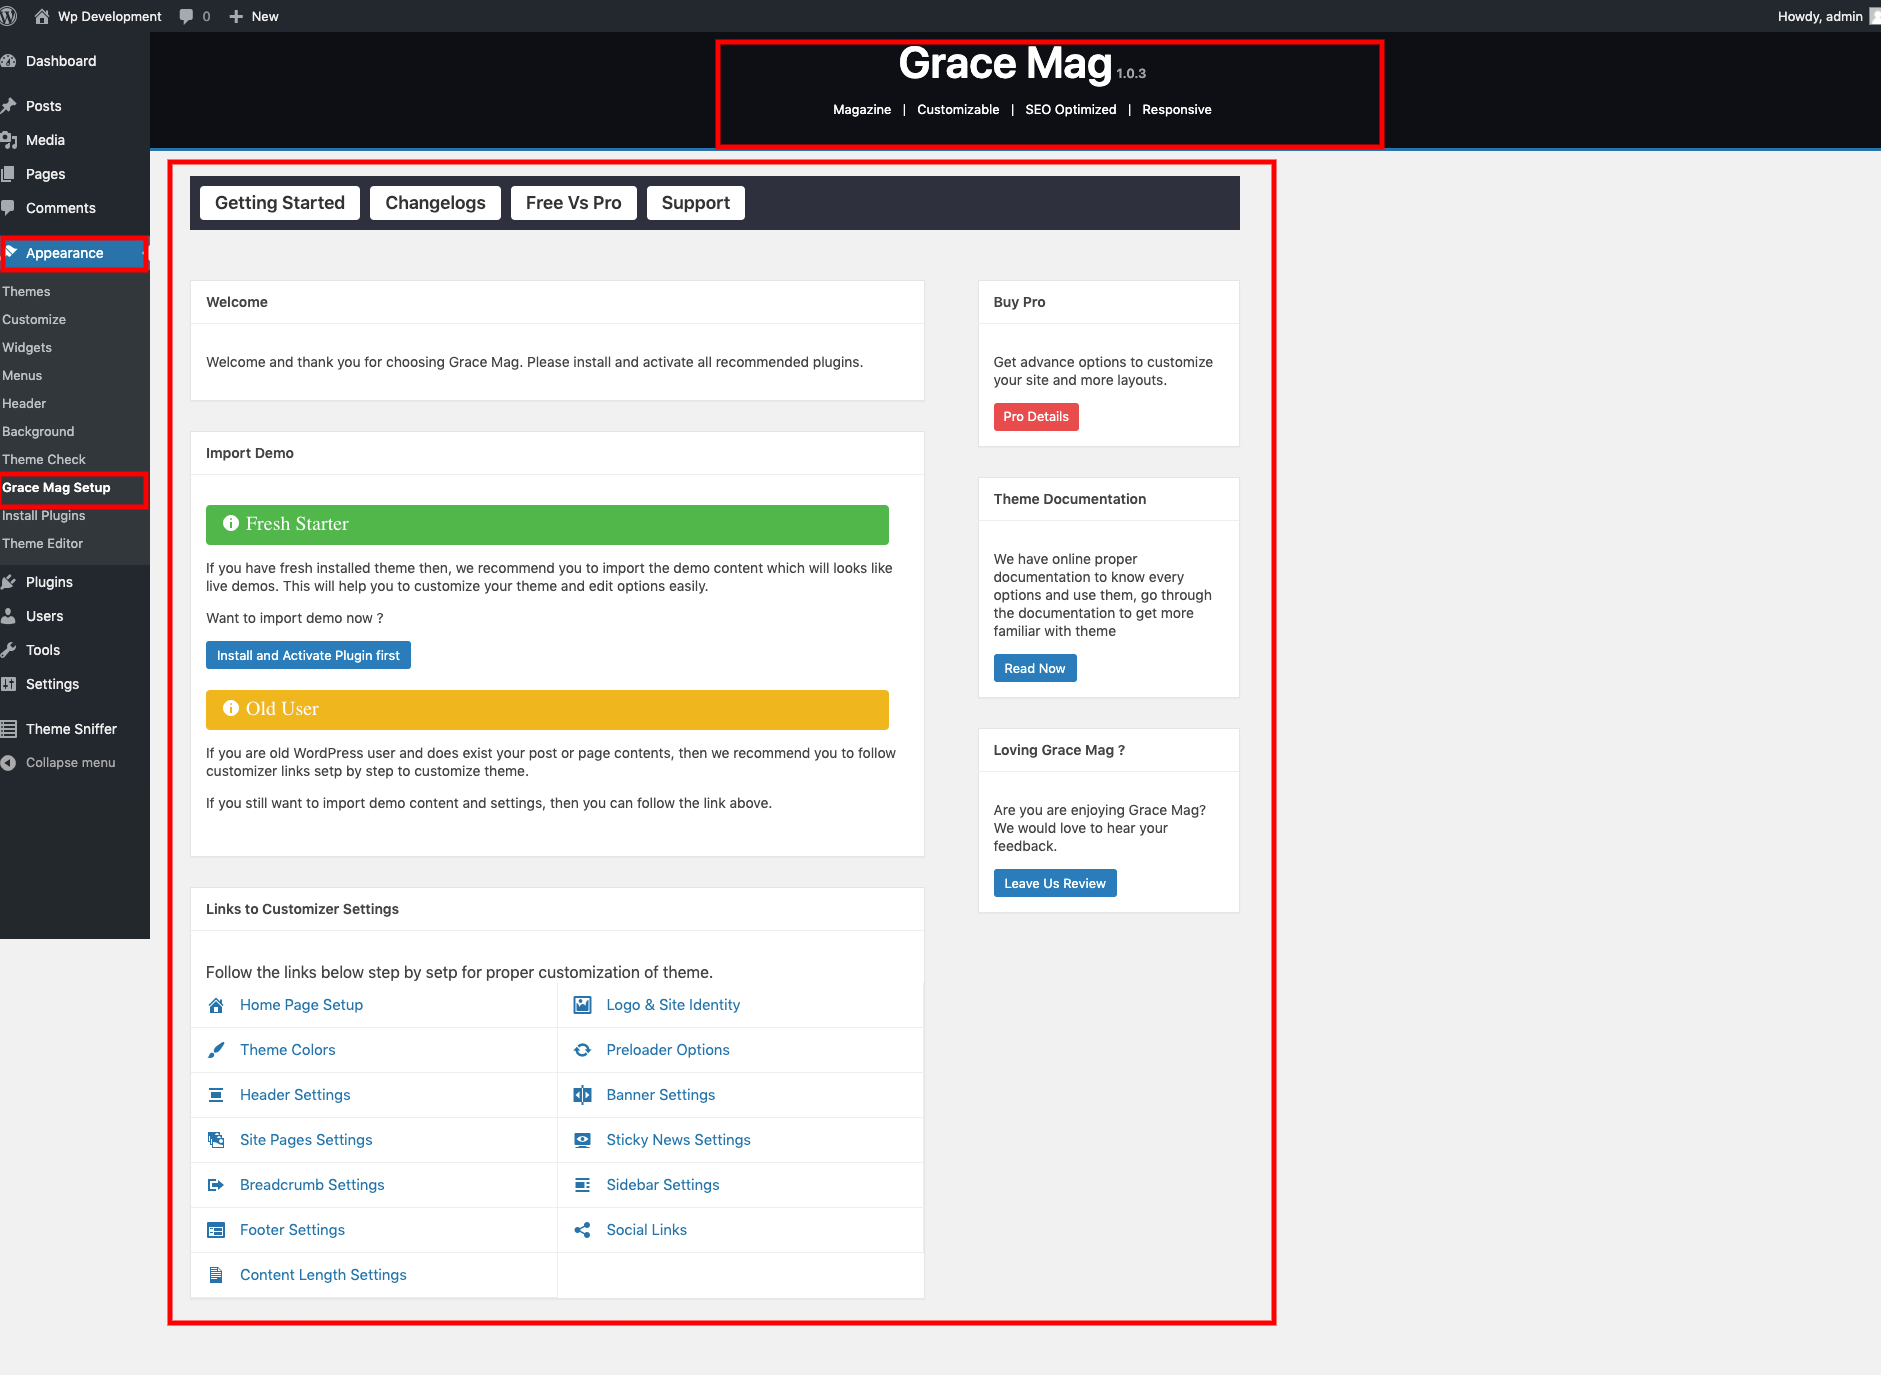
For Free Users :
After navigation to setup page i.e welcome page, you can see different tabs and links for customization of theme. Manually, you can navigate to Appearance → Grace Mag Setup. You can see the image below for reference:
#IMPORTING DEMO
FRESH WORDPRESS USERS:
We assume demo import is best for a new and freshly installed WordPress site. If you have fresh and Newly WordPress installed then the first step is
Delete Hello world! Post form Dashboard → Posts
Also Delete Sample page from Dashboard → Pages
These Post and Pages comes by default to get the best and exact demo.
For Demo Import you need to go in Appearance → Import Demo Content. You will see the available demo. Choose the demo you would like to install and wait without doing anythings until demo import process completes. After completion system will pop up the message of successfully imported.
FOR EXISTING WORDPRESS USERS :
We do not recommend Demo Import options for an existing user. Rather you can go to Appearance → customize and give some time to customize your website using available options.
However If your site has old data and you importing a demo, then you should not freak out about old data. Your old data will not be removed or replaced. You have to go to Dashboard → Appearance → Import Demo Content.
After navigating to Import Demo Content, you will see different available demos. You can live preview from there and import also. Click on the Import button to import demo data. Lean back and wait for approximately 3-5 minutes, depending upon various factors. That’s all you need to do. When demo import is done, now its time to setup blog page, widgets, banner, menu and a few other settings according to your requirements.
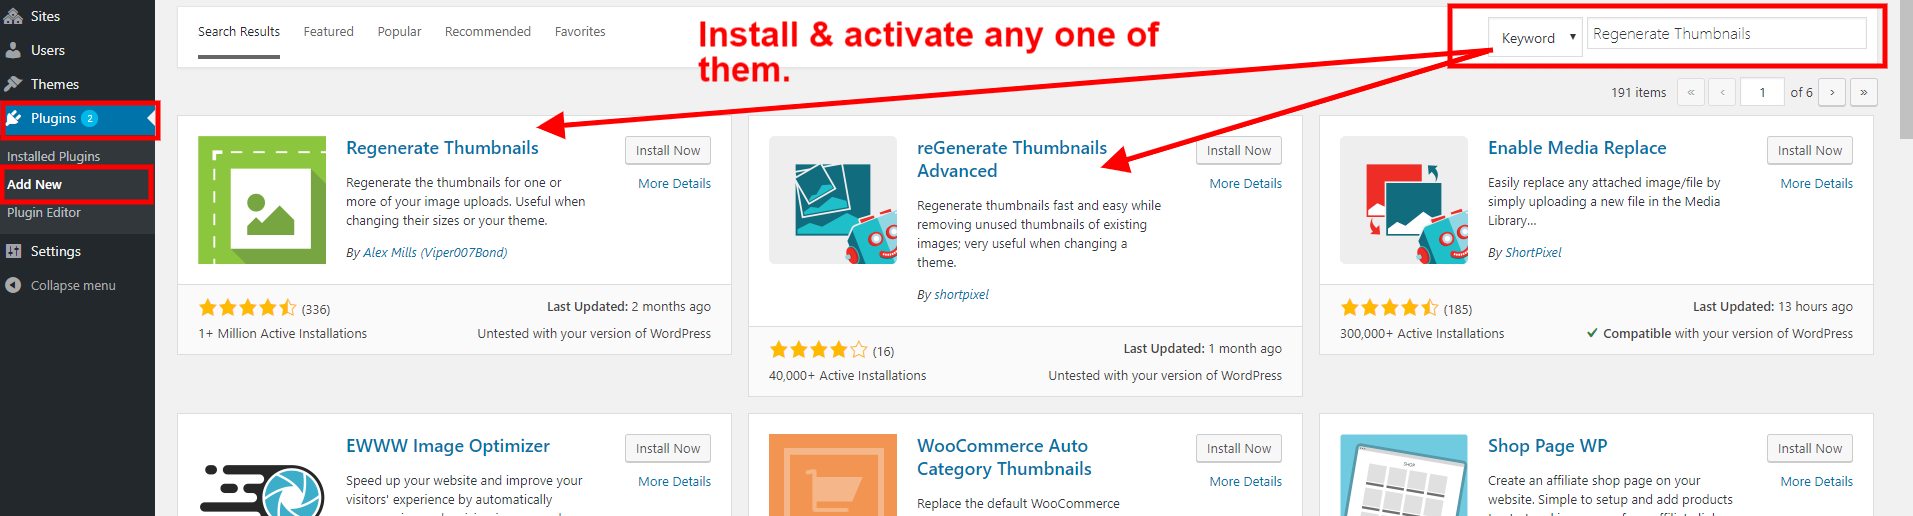
IMPORTANT NOTE:
If your site content is empty (no posts/pages), you have nothing to do more. But if your site has posts/pages, you have to use a plugin Regenerate Thumbnails to generate necessary thumbnails for Grace Mag Theme. You can install Regenerate Thumbnails from Dashboard → Appearance → Plugins → Add New. Search for Regenerate Thumbnails, install plugin and activate it. (Install & use this plugin only after installing and importing demo.) Check the image below for reference:
#HOMEPAGE SETUP
First Step :
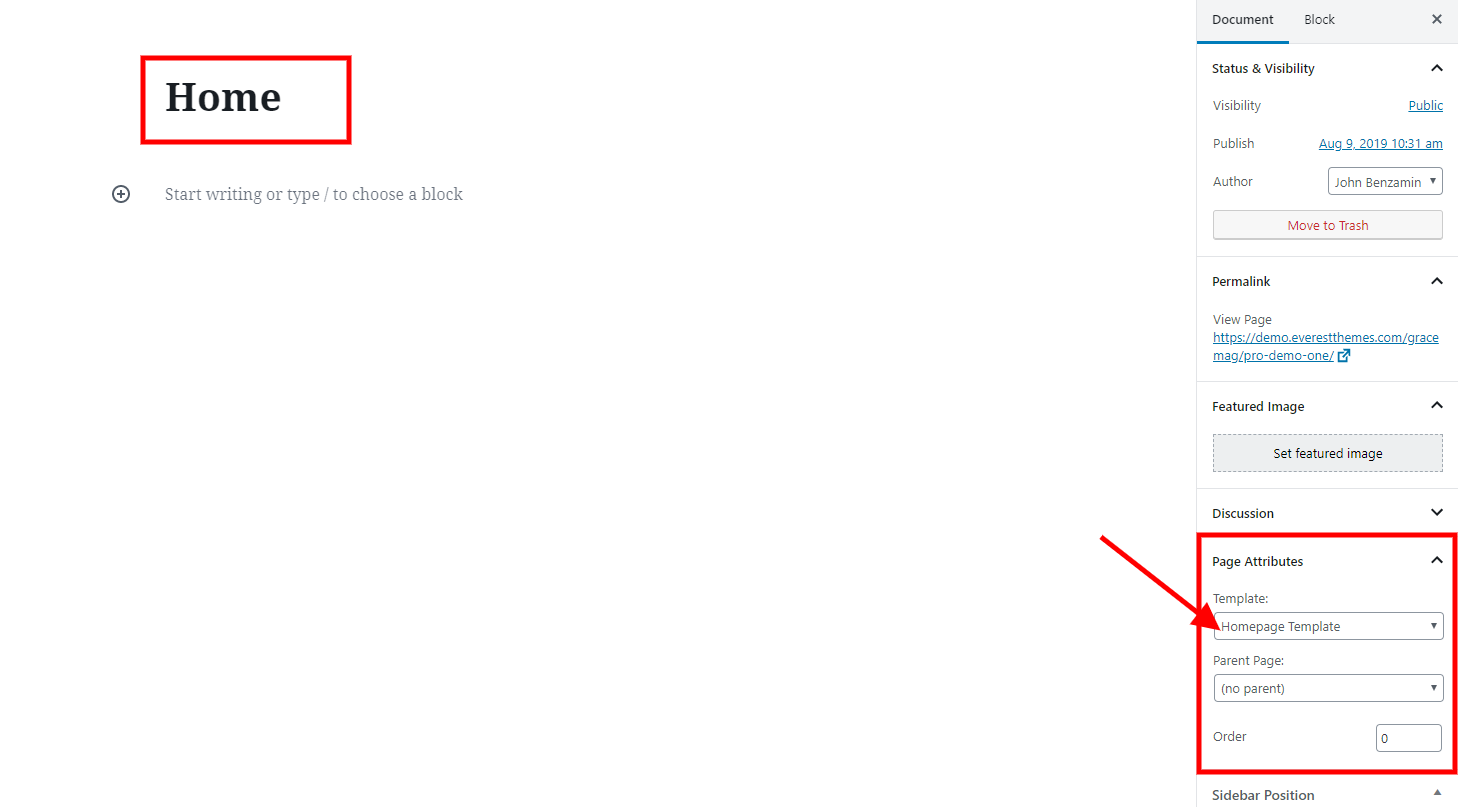
First of all, you have to create two pages for homepage and blog page. For that, go to Dashboard → Pages. You can create new page or use existing page. For now, you can set page name as ‘Home’ for homepage and ‘Blog‘ for blog page which will be easy to understand.
Then, edit Home named page or any page you are going to set for homepage. Go to Page Attributes on right side of the page and you can see Template. Select template as ‘Homepage Template‘ and update the page. See screenshot below for reference :
Second Step :
From Dashboard go to Settings → Readings. Set your Homepage displays options to A static page and selects the page you created for homepage in HomePage button option and blog page in Posts Page option. If you have followed the above instructions, you can see exactly what you have to do and for reference also :

Don’t forget to save changes. ?
Check out the video below for each and every step:
#CUSTOMIZE THEME
Grace Mag Theme is crafted with handy important customization options powered by WordPress live customizer. You can find all options under Dashboard → Appearance → Customize.

Now let’s dive one by one to these customizer options.
GLOBAL TYPOGRAPHY:: PRO VERSION :
You can customize Global Typography options globally. Individual typography options are also available on the specific section. You can find those options as per you go through individual sections below documentation.

Check out the video on how to customize Global Typography :
GLOBAL COLOR OPTIONS:: PRO VERSION :
You can customize Color Options for different sections as shown in the image below. Besides these, you can find advanced color options to customize different sections. You can find those options as per you go through individual sections below documentation.
For a guide about customizing the Global Color, check out the video below :
SITE PRELOADER OPTIONS :
You can either enable or disable to show the preloader on the site. This is global option and is shown on every pages if you enabled it. You can find this option in Dashboard → Appearance → Customize → Site Preloader.
SITE HEADER OPTIONS :
Different 3 Header Layouts are available on the PRO VERSION where as only 1 is available on FREE VERSION. Some other options are limited or not available on FREE VERSION. Please check out the video to customize everything related to Header Section.
SITE BANNER OPTIONS :
Different 4 Banner Layouts are available on the PRO VERSION where as only 1 is available on FREE VERSION. Some other options are limited or not available on FREE VERSION. Please check out the video to customize everything related to Banner Section.
SITE PAGES :: BLOG PAGE OPTIONS :
Different 3 Blog Page Layouts are available on the PRO VERSION where as only 1 is available on FREE VERSION. Some other options are limited or not available on FREE VERSION. Please check out the video to customize everything related to Blog Page.
SITE PAGES :: ARCHIVE PAGE OPTIONS :
Different 3 Archive Page Layouts are available on the PRO VERSION where as only 1 is available on FREE VERSION. Some other options are limited or not available on FREE VERSION. Please check out the video to customize everything related to Archive Page.
SITE PAGES :: SEARCH PAGE OPTIONS :
Different 3 Search Page Layouts are available on the PRO VERSION where as only 1 is available on FREE VERSION. Some other options are limited or not available on FREE VERSION. Please check out the video to customize everything related to Search Page.
SITE PAGES :: ARCHIVE/SEARCH/BLOG PAGE TYPOGRAPHY OPTIONS :
You can find typography options related all archive/search/blog page. You can customize typography of post title from here. See the video below for reference :
SITE PAGES :: POST SINGLE OPTIONS :
Different 2 Single Post Layouts are available on the PRO VERSION where as only 1 is available on FREE VERSION. Some other options are limited or not available on FREE VERSION. Please check out the video to customize everything related to Single Post.
SITE PAGES :: PAGE SINGLE OPTIONS :
Different 2 Single Page Layouts are available on the PRO VERSION where as only 1 is available on FREE VERSION. Some other options are limited or not available on FREE VERSION. Please check out the video to customize everything related to Single Page.
SITE PAGES :: SINGLE POST/PAGE TYPOGRAPHY OPTIONS :
You can find the typography options related to single post/page in this section. You can customize the post title of the post/page. See the video below for reference :
SITE PAGES :: COMMON OPTIONS :
You can find all the common options related to site pages from here. You can upload the background image which is appeared on archive/search/blog/post/page. For reference, you can see the video below:
SITE SIDEBAR :
You can enable or disable sticky sidebar throughout whole website from here. For individual sidebar options for showing them in right or left or not showing them, it has shown in the videos above. This option is available on both PRO VERSION & FREE VERSION. Beside sticky sidebar options, you can find color and typography options related to widgets in here which is only available on PRO VERSION. Check out the video below for reference :
SOCIAL LINKS :
There are 4 Social Links available in both PRO VERSION & FREE VERSION along with RSS Feed option here. Check out the video for details about customizing social links.
SOCIAL SHARE :: PRO VERSION :
You can display Social Share options on pages and posts. There are 4 different popular sites to share your posts or pages. Check out this video to customize social share.
GLOBAL EXCERPT LENGTH :
You can set the global excerpt length (content length) of the site from here which is available in both PRO VERSION & FREE VERSION. Check out the video below for reference:
SITE FOOTER :
Check out the video to customize your Site Footer. Limited options are available on FREE VERSION. You can customize options related to Scroll Top and Copyright Text here.
STICKY NEWS :
We have added sticky news section which shows post sticky while you are scrolling. This is available on both PRO VERSION & FREE VERSION. You can find options to edit the content from customizer. Navigate to Dashboard → Appearance → Customize → Sticky News. There you can find options to customize this section. Take a look at screenshot below for reference :

#WIDGETS
FULLWIDTH NEWS WIDGET :
This widget is available for both PRO VERSION & FREE VERSION. Different layouts and other options are added on PRO VERSION. Check out the video below for reference :
NOTE : This widget can only be used on Fullwidth Top News Area and Fullwidth Bottom News Area.
HALFWIDTH NEWS WIDGET :
This widget is available for both PRO VERSION & FREE VERSION. Different layouts and other options are added on PRO VERSION. Check out the video below for reference :
NOTE : This widget can only be used on Middle News Area.
SOCIAL WIDGET :: PRO VERSION :
This widget is available only for PRO VERSION. Check out the video below for reference :
NOTE : This can be used on all widget areas but cannot be used on Top Widget Area and Bottom Widget Area.
POST WIDGET :
This widget is available for both PRO VERSION & FREE VERSION. Some other options are limited or not available on FREE VERSION. Check out the video to edit Post Widget.
NOTE : This can be used on all widget areas but cannot be used on Header Advertisement, Fullwidth Top News Area, Middle News Area and Fullwidth Bottom News Area.
USERS WIDGET :: PRO VERSION :
This widget is available only for PRO VERSION. Check out the video to edit Users Widget.
NOTE : This can be used on all widget areas but cannot be used on Header Advertisement, Fullwidth Top News Area, Middle News Area and Fullwidth Bottom News Area.
VIDEO NEWS WIDGET :: PRO VERSION :
Check out this video in order to manage Video News Widget.
NOTE : This can be used only on Middle News Area.