INTRODUCTION
Thank you for using our Everest News WordPress Theme.
Everest News is magazine WordPress theme with a clean & modern design suitable for everyone who wishes to share their stories, publish a piece of breaking daily news or write on different topics and live events also.
Everest News is built taking SEO, Speed & Responsive in mind. Build-in features like lazy load for images has been implemented to make Everest News load faster & extra library files have been bundled to minimize HTTP requests.
Quick Installation Guide for Demo Import

This document written very carefully by keeping a mindset that it should be easily understood for Beginner to Advance user or developers.
If you have any query that is beyond the scope of the document, please feel free to contact us at [email protected] or visit our support forum.
* NOTE: Click on the screen shot if the text written at the screen shot is not readable.
We have used lazy load in Everest News Theme which will help your website to save bandwidth & load faster. While implementing lazy-load we maintain aspect ratio for all images. We recommend you to upload likely the recommended image size or greater. Below is the images size that you must be uploading.
- For featured image, full-width slider, all news widgets or banner image, we recommend using
- 820 * 470 px size in image or larger.
- Minimum size to upload image size is 550 * 400.
- For author widget area, we recommend using 150* 150 px size in image or larger.
INSTALLATION
#STEP I :
THEME INSTALLATION THROUGH WORDPRESS DASHBOARD
You can install Everest News theme from WordPress admin dashboard. This will be the first process of installing the theme on your WordPress website.
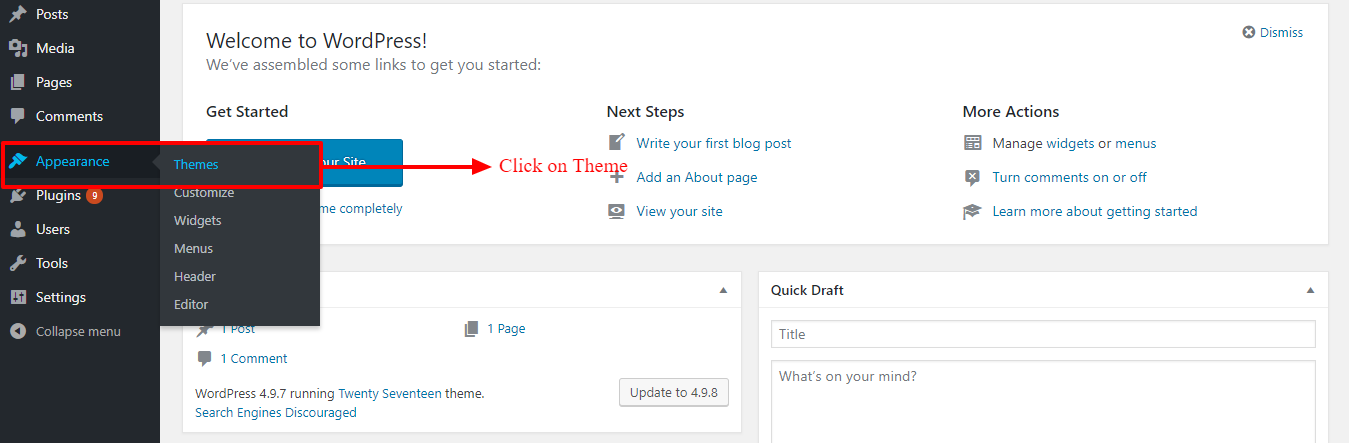
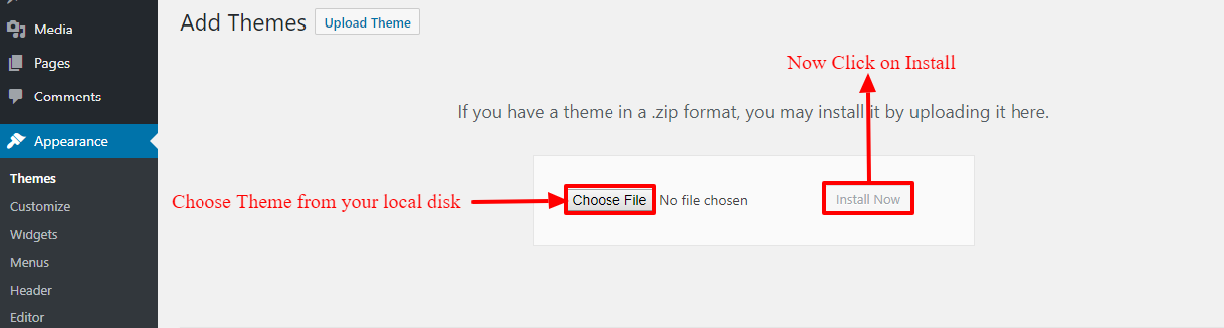
Select the theme from your computer & hit install. After you install Activate theme.
#STEP II :
THEME INSTALLATION THROUGH FTP
- Login to you file manager with FTP client with your FTP user-name & password
- Navigate to your WordPress installation
- Navigate to wp-content folder and then to themes folder.
- Upload our theme folder with the FTP client to Themes folder inside wp-content folder
- Log-in to wordpress dashboard & now activate the theme.
After Installation and Activation of Theme
#STEP III :
*Note: If you are pro users, then please kindly install and activate “Everest Toolkit” which is required plugin. You can install from Dashboard > Plugins > Add New and search for Everest Toolkit and install plugin which is uploaded by author “everestthemes”. If you have some trouble regarding it, you can download by Clicking Here. Go to Dashboard > Plugins > Add New, click on Upload Plugin and upload the file you downloaded without extracting zip file. And then activate this plugin.
LICENCE ACTIVATION : ( PRO USERS ONLY )
If you are moving from free theme to pro theme of Everest News, then you have to install Everest News Pro Theme which will be provided to you when you bought it. See the screenshot below for reference.

Make sure, you have installed Everest News Pro Theme. After it, you will see Theme License under Appearance Use the License Key which you have received while buying the theme.
FOR FRESH WORDPRESS USERS :
Once you’ve Everest News, theme installed and activated, a message will pop up to install “Everest Toolkit”. Install this plugin and activate it. Now, go to Dashboard > Appearance > Everest News Info and install all the plugins recommended by us. You will also find short links for customization and support. For importing the demo contents, please go to STEP IV and follow further instructions.

We suppose demo import is best for a freshly installed WordPress site. Delete Hello world! post form Dashboard > Posts & Sample page from Dashboard > Pages which comes by default to get the best and exact demo. For Demo Import you need to go in Appearance >> Import Demo Content and choose the demo you want to install. For ref Look the above screenshot.
FOR EXISTING WORDPRESS USERS :
After activating the theme, install and activate the plugin “Everest Toolkit” which is recommended by us. A message is pop up from which you can install with a single click. After it,
Case I:
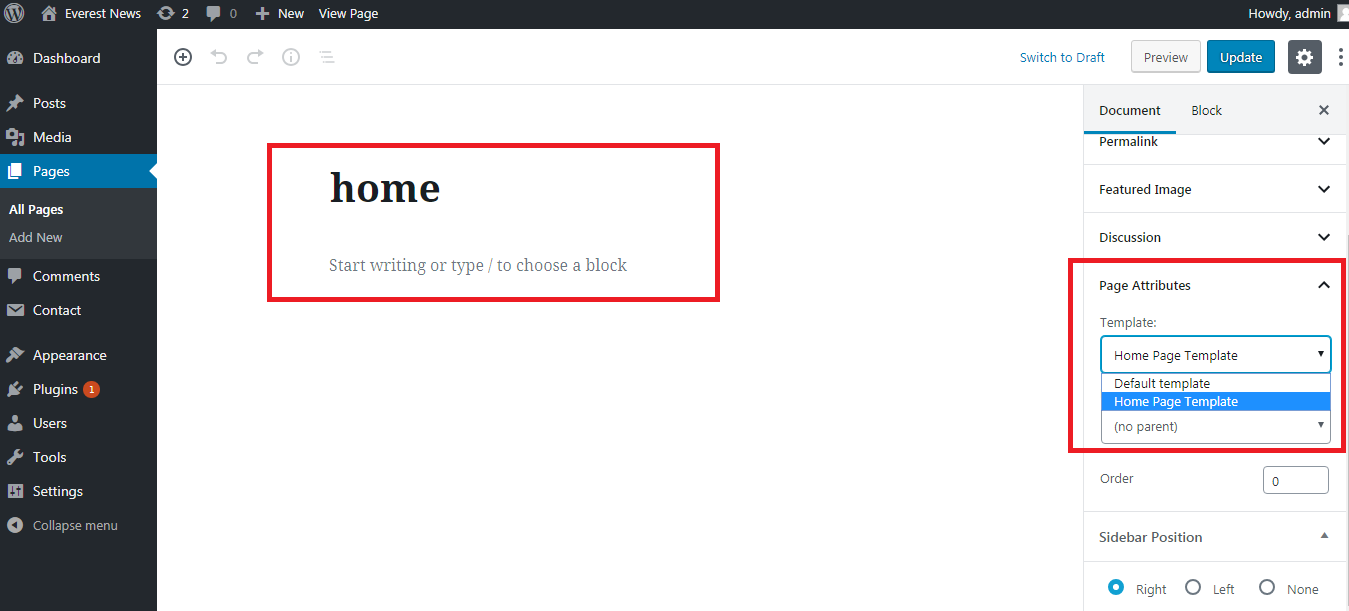
If you do not have home page , then create a new home page and don’t forget to assign page Templates as Home Page Template and then publish it or update the page. As shown in figure below.
Case II:
You have already home page in your pages list then simply assign its templates as Home Page Template and update the page.
Case I and Case II :
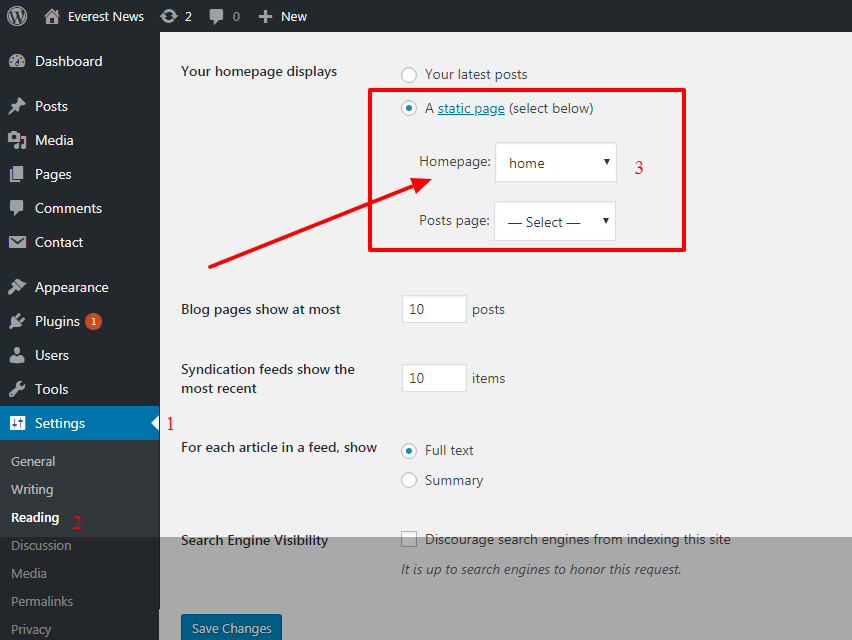
Now you have to check whether your homepage and blog page is set or not. You can find this setting in your Dashboard Settings >> Reading
Now Chose A Static Page (select below) and in Homepage choose your home ( remember your home page template should be Home Page Template. If confused look at the above screenshot. Now save settings thats all now you can go to widgets sections and set your widgets settings.
If you are not sure then, you can go to Dashboard > Appearance > Everest News Info and click on Set Front Page. If they are set properly then there is noting to worry about using our theme. If they are not, then please kindly follow instructions on STEP VI.
If you want to import our demo contents, then you can move to next step.
#STEP IV :
DEMO DATA IMPORT
Lean back when we take care of everything. We have made demo import more convenient for you.
Just follow A single step to Import Demo Data.
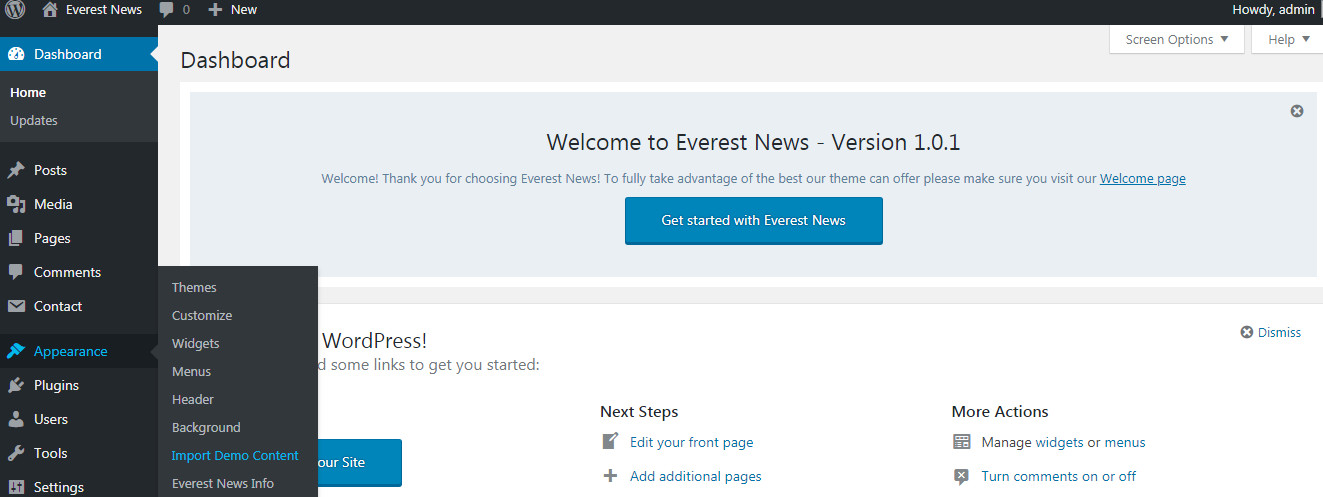
- Go to Dashboard > Appearance > Import Demo Content.
You will see different available demos. You can live preview from there and import also. Click on Import button to import demo data. Wait for approximately 3-5 minutes depending upon various factors.That’s all you need to do. When demo import is done, now its time to setup widgets, banner, menu and few other settings according to your requirements.
Note : If you have already some post and pages and do not want to import our demo data then read and follow this documentation till last words.
#STEP V :
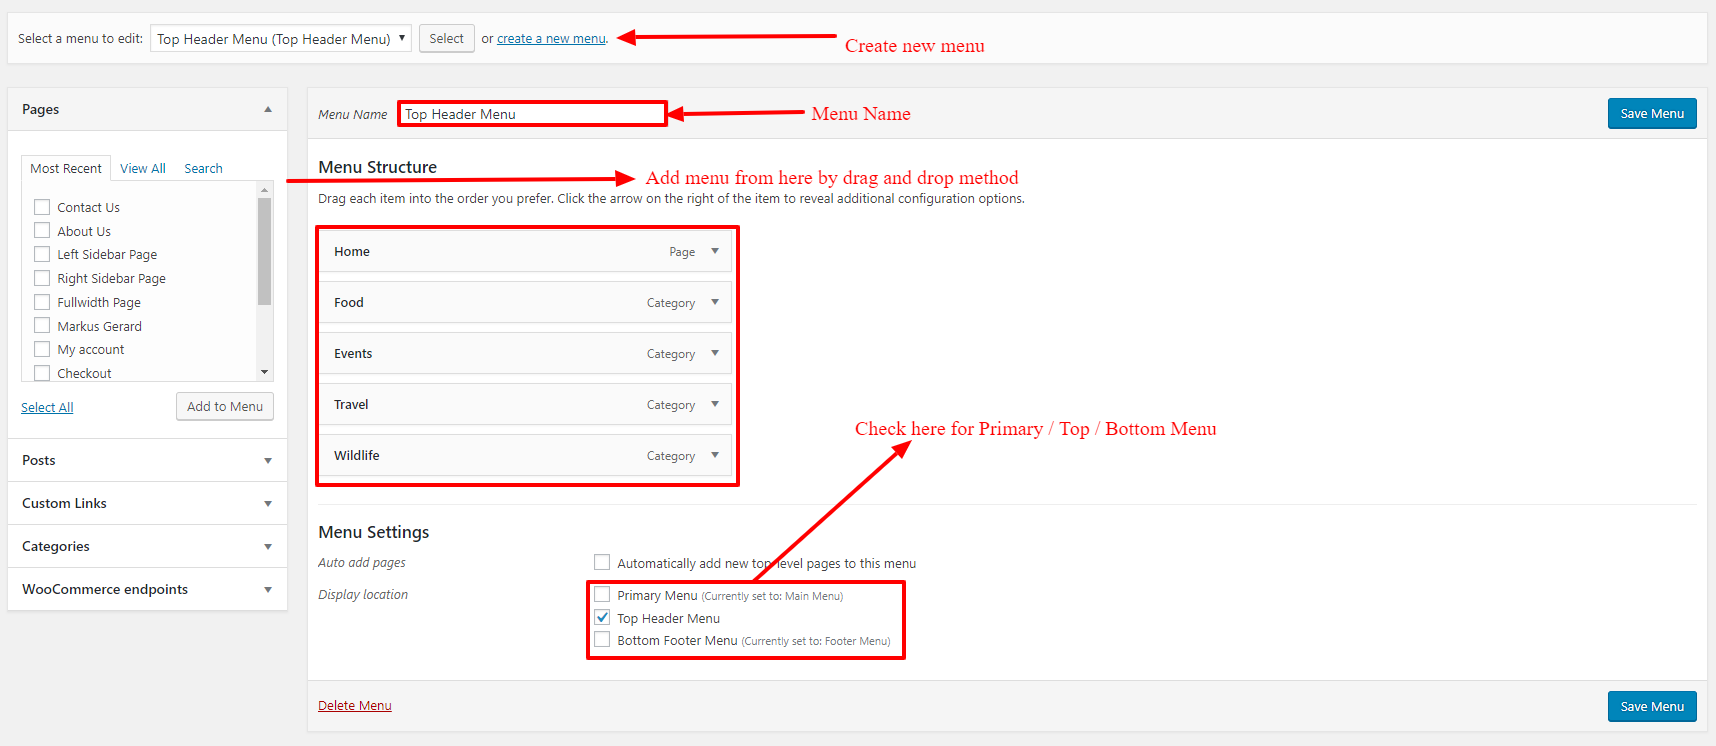
SETUP MENU/NAVIGATION
Navigation can be added from WordPress dashboard > Appearance > Menu.
See the screen shot below:
#STEP VI :
ACTIVATE HOMEPAGE/BLOG PAGE
By default WordPress sets all theme to blog page ( NOT HOME PAGE ). You have to manually set your homepage. To set your Homepage and Blog Page, create pages with any name like Home for homepage and Blog for blog page and you navigate to Dashboard > Appearance > Everest News Info and click on Set Front Page. Then check on A static page and set you created pages for homepage and posts page respectively.
If you think your FrontPage/ Homepage didn’t got activated let us know.
CUSTOMIZER OPTIONS
Everest News is crafted with handy important customization options powered by WordPress live customizer. You can find all options under Dashboard > Appearance > Customizer.
#Site Layout :
From , Dashboard > Appearance > Customize > Site Layout , you can set your site layout either in full width or boxed layout.
If you select Boxed Layout, you can set the background image in Dashboard > Appearance > Customize > Background Image.
#Font Option : ( Pro )
You can switch between 800 ++ Google fonts according to your requirements which can be found on the Dashboard > Appearance > Customize > Typography Customization.
#Colors : ( Pro )
You can switch any primary color & secondary color that best match your brand or need. You can find all options under Dashboard > Customize > Color Customization. You can also set colors to menu and sub menus also.
#Custom Logo :
You can upload your custom logo or your site text in Dashboard > Appearance > Customize > Site Identity. You can also use tagline and upload site icon from here.
#Sidebars :
We understand that some peoples may not like sidebars. To make your need hassle free we have added sidebar options you can have sidebar either in left, right or completely disable it on either single page or single post or any archive pages. This will be discussed on below different topics.
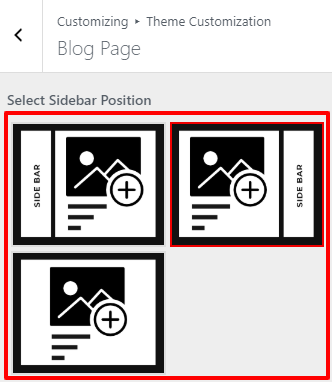
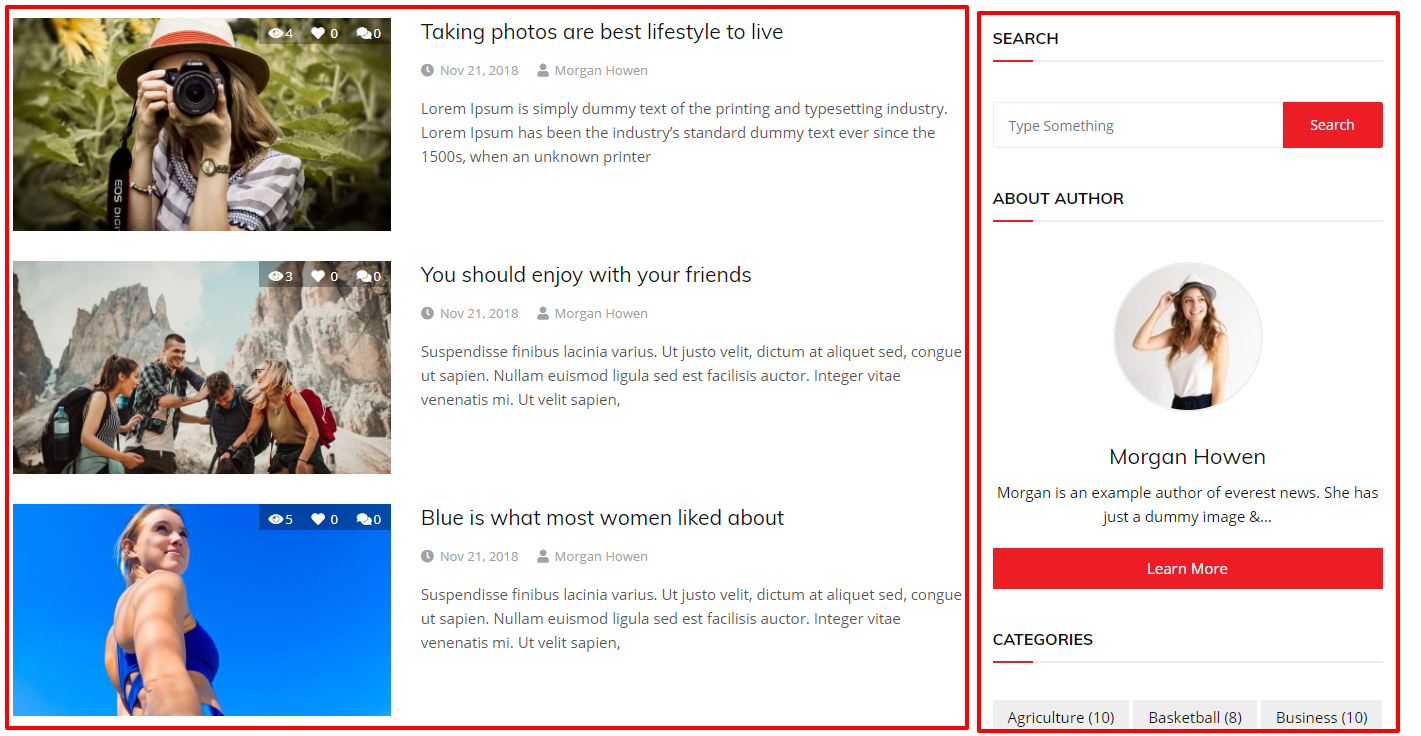
#Blog Page :
Everest News has only 1 default archive page layout. You can set option for sidebar to show either on right side or left side or no sidebar on Dashboard > Appearance > Customize > Theme Customization > Blog Page. See the screenshots below for layout and sidebar :
#Archive Page :
Everest News has 2 different archive page layouts. Go to Dashboard > Appearance > Customize > Theme Customization > Archive Page and choose the layout you want.You have an option to show the archive type. You can also have option for sidebar to show either on right side or left side or no sidebar. You can see the references from the below screenshots :
#Search Page :
You can assign the sidebar or disable to search page. For this, go to Dashboard > Appearance > Customize > Theme Customization > Search Page.
#Excerpt length :
You can change the length of excerpt from Dashboard > Appearance > Customize > Theme Customization > Post Excerpt. If you have sidebar, then post excerpt length should be decreases up to which it makes design good and match the design. If no sidebar is chosen, then it should be increases up to which it match the design. This same concept is applied to homepage news widgets also. By default, it is set to 15.
#Social Links :
Social Links are available to header section only. You can set it only on Header Layout 1 , Header Layout 2 , Header Layout 3 & Header Layout 5. You can customize it on Dashboard > Appearance > Customize > Theme Customization > Social Links.
#Breadcrumb :
Everest News has 1 layout for breadcrumb. You can find this on Dashboard > Appearance > Customize > Advance Customization > Breadcrumb to enable or disable. See the screenshot below :
#Fall back Default image : ( Pro )
You can enable support of fall back image if there is no image in post from Dashboard > Appearance > Customize > Theme Customization > Fallback Image.
#Miscellaneous :
You can enable or disable sticky sidebar and scroll to top from Dashboard > Appearance > Customize > Theme Customization > Miscellaneous.
#More :
More basic options are available!
HOMEPAGE SETTING
#HEADER SECTION :
Options for Header section are placed inside WordPress customizer which are Top Header , Home Button , Search Button , Toggle Sidebar Button and Header Layouts. You can find these options in the Dashboard > Appearance > Customizer > Theme Customization > Header.
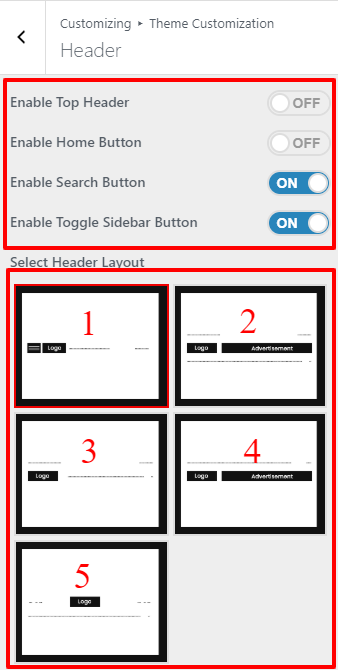
Top Header :
This appears on the top menu bar and can be able to either enable or disable. This can be set only on Header Layout 2 & Header Layout 3 which are discussed on below sections.
Home Button :
You can enable or disable to show home button. This is only available on Header Layout 2.
Search Button :
This appears on the menu bar and can be able to either enable or disable. It can be in all header layouts.
Toggle Sidebar Button : ( Pro )
This appears on the menu bar and can be able to either enable or disable. This is only available on Header Layout 1 & Header Layout 5.
#HEADER LAYOUTS :
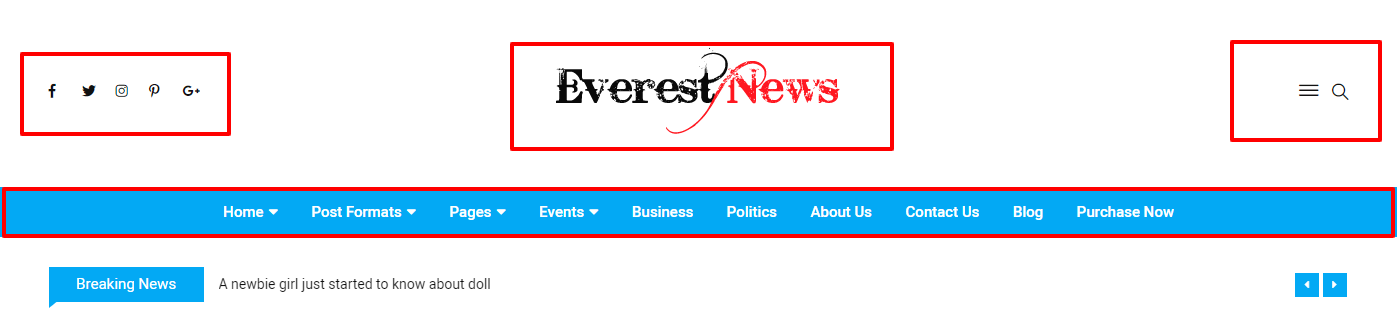
Header Layout 1 : ( Pro )
This header layout has Primary Menu which can be set from the menu which is described in SETUP MENU section. Social links are managed from the Dashboard > Appearance > Customizer > Theme Customization > Social Links. You can use 3 social links in this header. You can also enable Toggle Sidebar Button for this header layout but not Home Button. For logo, we recommend to use 217 px of width & 50 px of height.

Header Layout 2 :
This header layout has the two menus : Top and Primary which can be set from the menu which is described in SETUP MENU section. Social links are managed from the Dashboard > Appearance > Customizer > Theme Customization > Social Links. You can use Home Button on this header but not Toggle Sidebar Button. Make sure, the height of the advertisement and logo equal. We recommend to use 90 px of height.

Header Layout 3 : ( Pro )
It is similar to Header Layout 2 which has Top & Primary menu. Make sure logo height is 90 px. Social links are managed from the Dashboard > Appearance > Customizer > Theme Customization > Social Links. You cannot use Home Button & Toggle Sidebar Button on this header.

Header Layout 4 : ( Pro )
This header layout is similar to Header Layout 2 which has Primary Menu which can be set from the menu which is described in SETUP MENU section. Make sure, the height of the advertisement and logo are equal. We recommend using 90 px of height. You cannot use Home Button, Toggle Sidebar Button & Social Links on this header.

Header Layout 5 :
This is clean header layout having the logo, Primary Menu without any background image, Social Links, Toggle Sidebar Button & Search Button. Logo can be of any size you want. You cannot use Home Button & can be use only 7 Social links in this header layout.
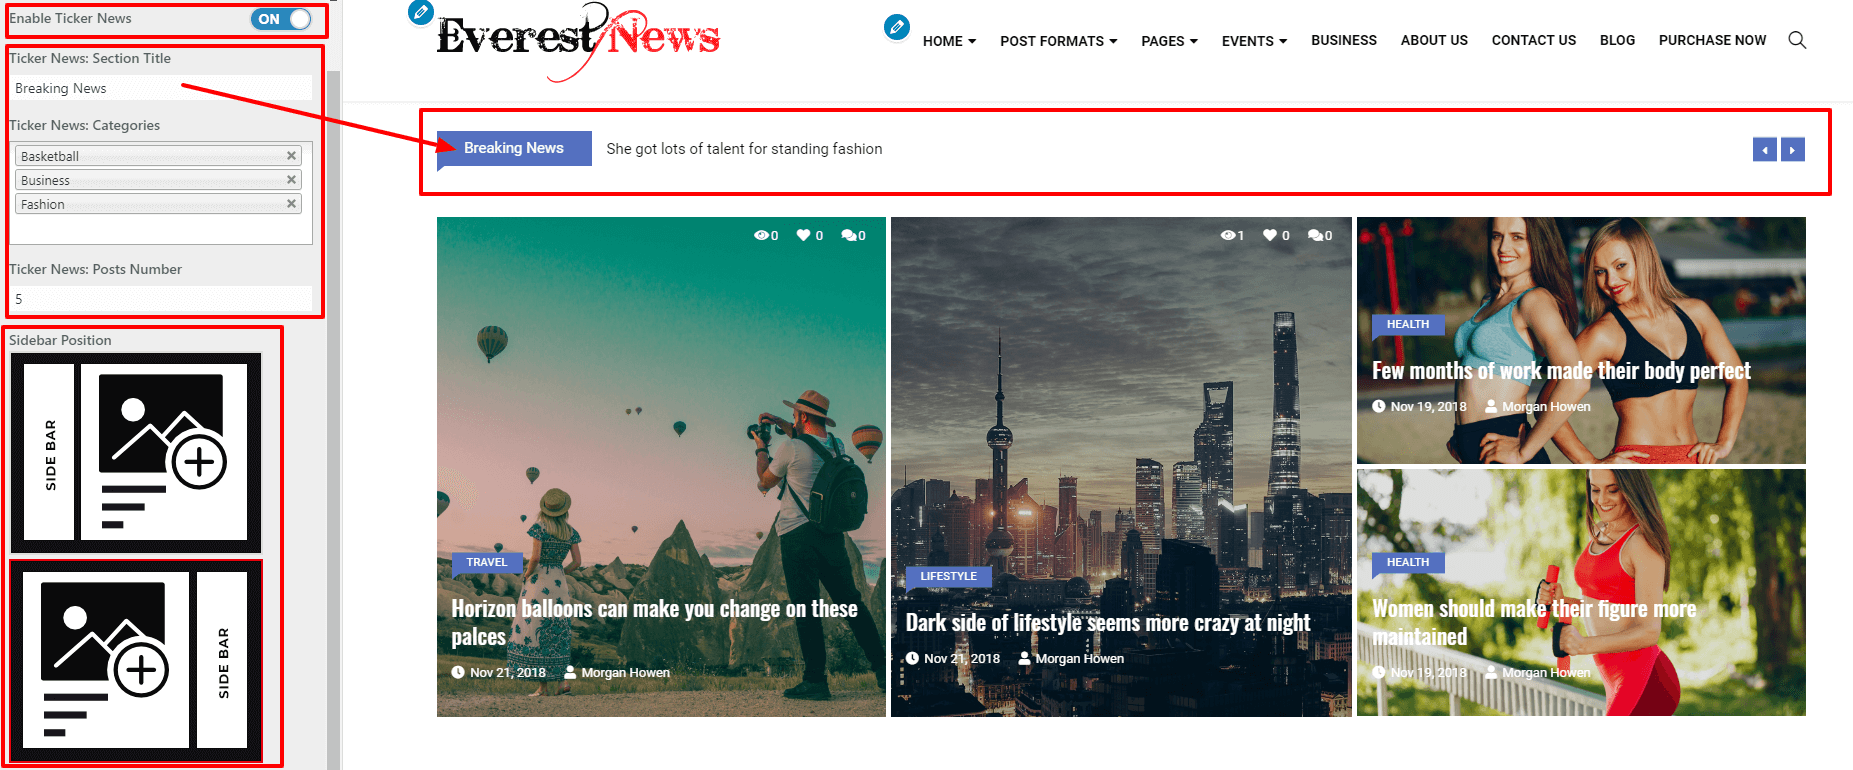
#TICKER NEWS / SIDEBAR SECTION :
You can enable or disable ticker news section and set sidebar position on Homepage either on right or left side which can be found in Dashboard > Appearance > Customizer > Theme Customization > Home.
For ticker news section, you can set the title, choose the category which to show on this section and post number also.
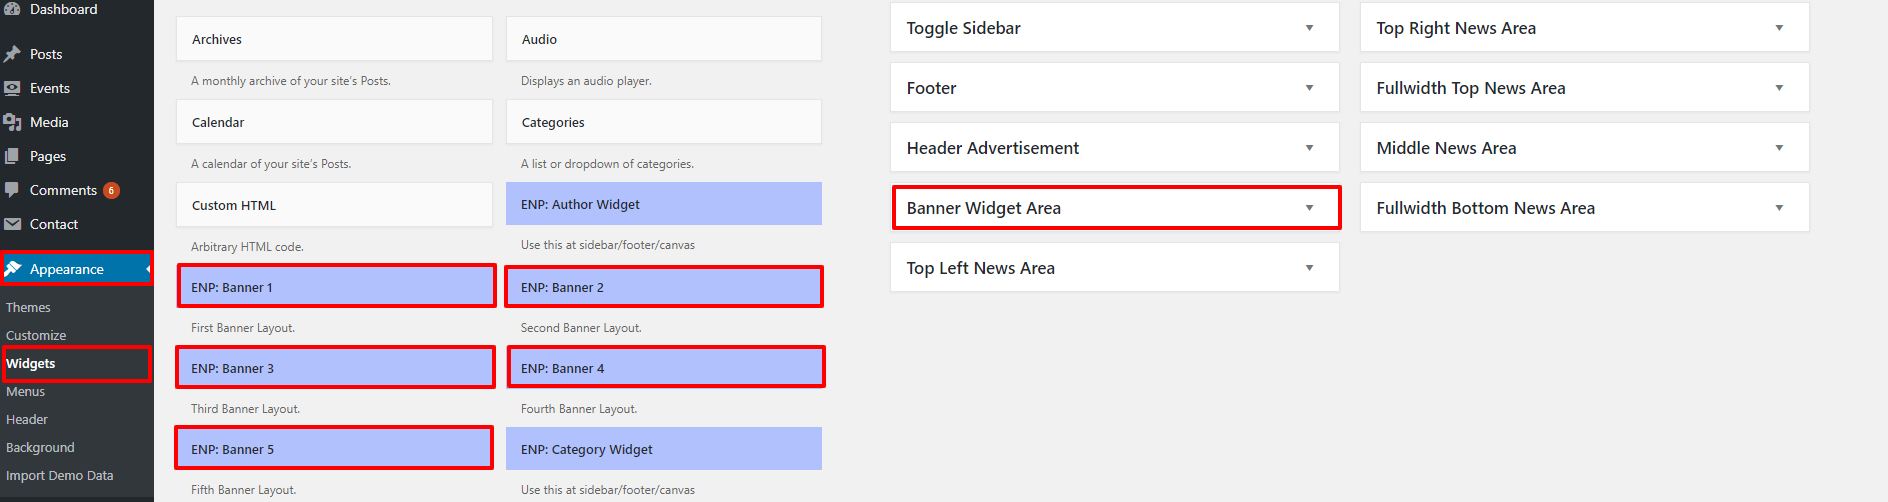
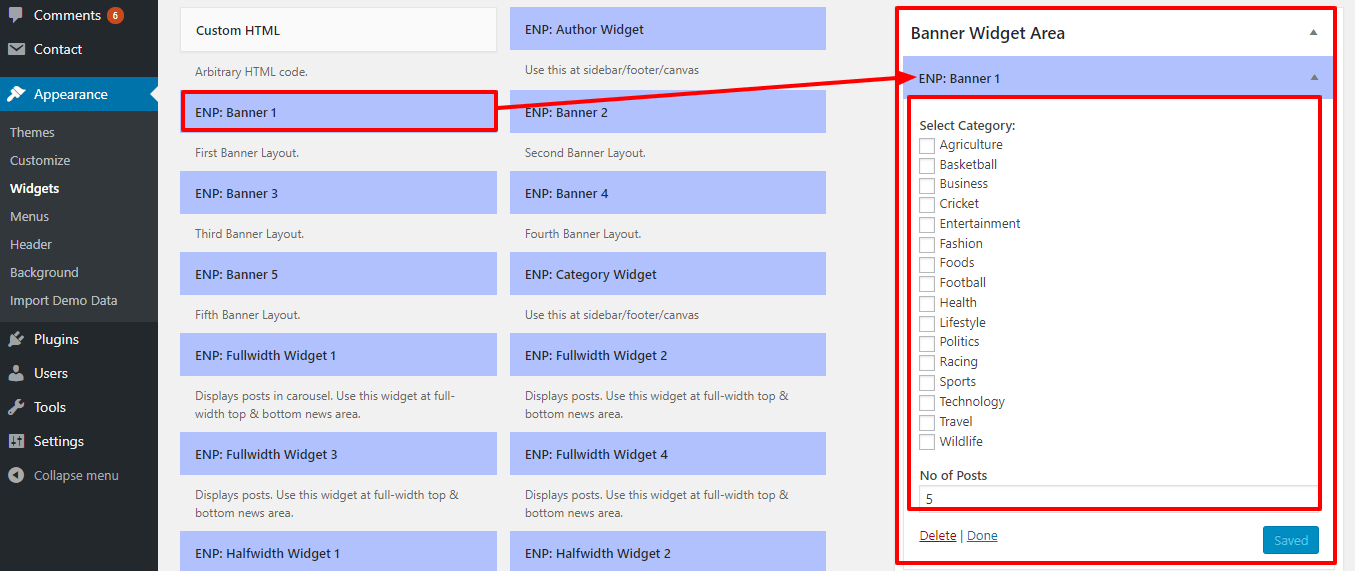
#BANNER SECTION :
Everest News comes with 5 types of banner options. You can find these options in the form of widgets which can be found on Dashboard > Appearance > Widgets. They are named with ENP: Banner 1/2/3/4/5. You have to simply drag and drop these widgets on the Banner Widget Area.
See the screenshots below for references & different Banner Layouts :
Banner Layout 1 :
In this banner layout, you can choose multiple categories to show with the posts number. This banner is in slider form. See the screenshots below for references :

Banner Layout 2 : ( Pro )
You can select multiple categories in this banner. The layout of this banner is in slider form which is shown in the screenshots below :
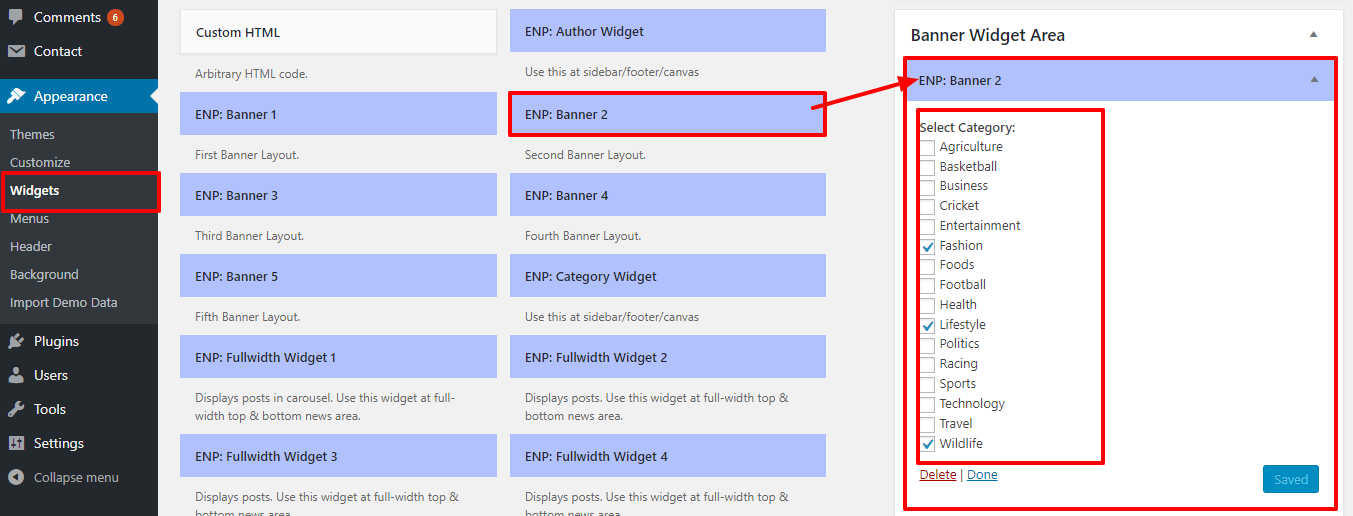
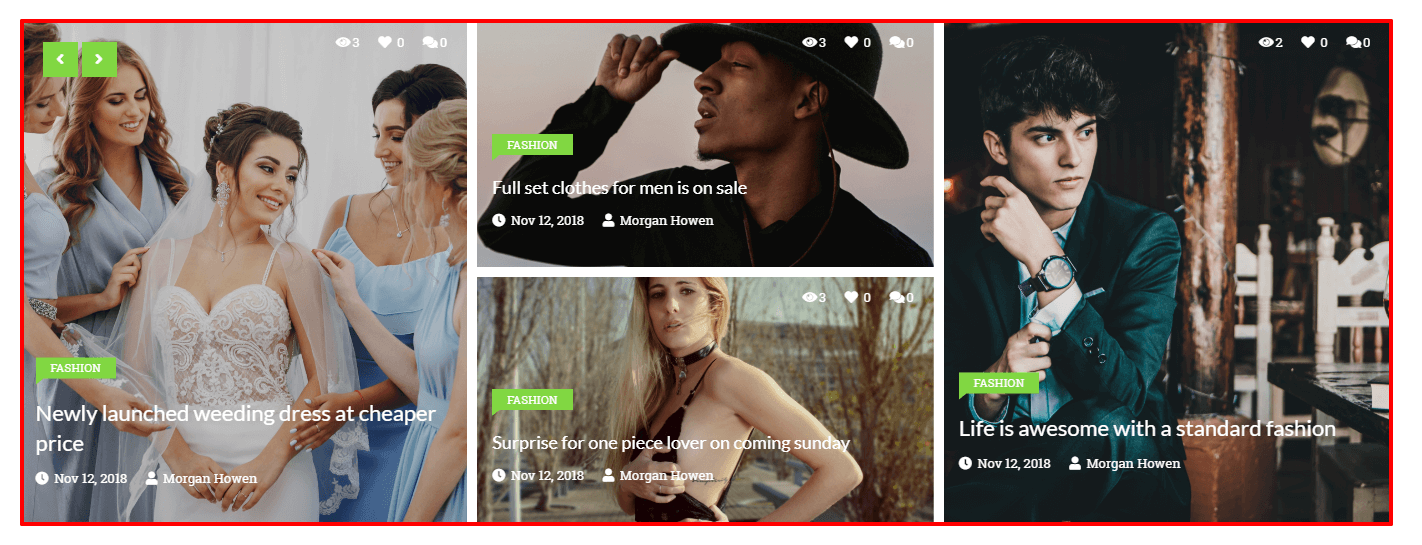
Similarly, we have Banner Layout 3, Banner Layout 4, and Banner Layout 5 :
To get details on each banner please visit our all demo where we have presented all the header and banner layout in each demo.
#NEWS WIDGETS SECTION :
There are different layouts for news area section which displays the posts on the basis of the categories chosen or recent posts. They are divided into Top Left News , Top Middle News , Top Right News , Fullwidth Top News , Middle News and Fullwidth Bottom News Areas which can be found on Dashboard > Appearance > Widgets.
*Note:
- Top Left News & Top Right News Areas are sidebar areas and uses the other default Sidebar Widgets , Popular & Trending Widget , Posts Widget , Author Widget , Category Widget and Social Widgets only.
- Top Middle News & Middle News Areas uses only ENP : Halfwidth Widgets. It has sidebar either on left or right side or on both sides.
- Fullwidth Top News & Fullwidth Bottom News Area uses only ENP : Fullwidth Widgets. They don’t have any sidebars.